
iPhone 11 How to repair the screen connector?
Publicado por PabloHas it ever happened to you that after changing a screen, it still doesn't work? Have you tried another one and it doesn't work either? Maybe it's just the touch function that doesn't work, but even so, you face this problem. Well, it has happened to us too, and that's why we bring you this guide.
We are obviously referring to the screen.
While performing soldering tasks and repairing integrated chips or connection flex cables is extremely difficult, risky, and slow, replacing connectors is not as complicated. Remember that you can always avoid issues by having purchased one of our iPhone 11 complete screen new and high-quality ones. The flex cables they incorporate are the perfect size and won't damage your connector.
We will take some considerations into account, which are:
- We will use as a replacement connector one from an old iPad. Why? Because it already comes pre-tinned. If we use a new connector, we will have to tin it ourselves, which requires the use of more technical tools.
- We will use solder, solder paste, and a 12W soldering iron.

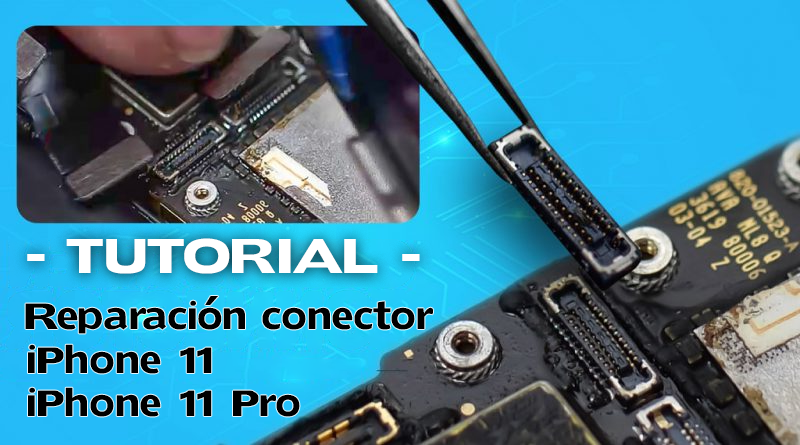
Most likely, this phone has already undergone a replacement (not very professional, by the way), and these changes have irreparably damaged the connector on the PCB (since the connector is located on a removable board).
We completely disassemble the phone, remove the star screws, and thus reach the board. We inspect the connectors that the phone has, and it is clearly damaged.
We protect the area around the connector with what is commonly known as aluminum foil to prevent any components from being damaged when applying heat (remember that there are some nearby plastic connectors). So, we apply 380°C until, using tweezers, the piece can be moved. We remove it and clean the area. We apply the soldering iron to the solder pins to leave the area pre-tinned, always being cautious with this.
We do the same on the iPad board to remove the connector, always being very careful not to damage what will be our final connector. We use solder wick to remove any excess solder that the connector might have.
Now, to solder the "new" connector and place it on the iPhone 11, we apply heat at 320°C and use solder paste to ensure that the tinned points stay where they should be. Remember not to use too much solder paste as the connector is very small. If you need solder, add a little. However, if you need to add solder, you will need a plate to make solder points because the connector is so fine that even a fine-tipped soldering iron will be too thick.
Once you have soldered it, apply heat to ensure all the solder joints are correct and check with a tester that the repair has been done correctly by evaluating the connection pins point by point. And if you just need to replace the screen, we recommend our iPhone 11 complete screen.
And that's it!


